Combining Virustotal, PassiveSSL and Timesketch

Motivation

Playing with Timesketch for a while and working on some OSINT timelines I was tired to investigate MD5 and domains / ips all manually so I tried to automate some of the work. Why is that important? If you have a list of hashes, domains and IPs, you of course can check your SIEM, EDR solution etc – but what if you have a hit? Would it benefit your investigation to at least have an idea of the timeframe something was used by attackers or seen in the wild?

Most shared indicators are lacking the timeframe, so we need to add those values by external information on our own.

Virustotal

There is no need to further explain Virustotal, it is basically a huge dataset of malware and information about domains and ips.

In particular information about a specific point in time a domain was seen to point to an IP and back is good to know to build your timeline.

E.g. if you have verymalicious.com pointing to 127.0.0.1 all the time, only on one day it was pointing to 1.2.3.4 – hits in your infrastructure should be higher escalated if seen during that day, out of that time window it might still be important, but not as urgent as during that day.

In regards to hash intelligence, Virustotal is nice, because if you add the info, when the last scan date of a file was, you can at least tell, that the file was known after that day.

I asked Virustotal to add more information they already have to the API and we will have wait till it is exposed:

  • First seen in the wild
  • First uploaded to VT
  • PE compile time

PassiveSSL

Alexandre Dulaunoy and Eireann Leverett have given a talk at the FIRST conference in Berlin back in 2015, which took my attention, but it took some time till I really had time to implement something to use the idea.

The basic idea is that, out of several sources, passive ssl services such as CIRCL passiveSSL collect certificates and expose information via API.

For timeline analysis in particular, the following dates are important as they might shine some light of attacker activity:

  • first seen in the wild
  • last seen in the wild
  • not use before
  • not use after

If you now add all of the information above, you might be able to get a better idea, when an IP / Domain / File was active.

This information should then be fed into a Timesketch investigation.

Example

Using some sample data from APT33: https://github.com/deralexxx/osint-timelines/blob/master/2018/2018-12-21.OVERRULED:-Containing-a-Potentially-Destructive-Adversary-APT33.csv

Combining with the python script below with the following indicators:

basepack.org
103.236.149.124
5.79.66.241
8d3fe1973183e1d3b0dbec31be8ee9dd
fa7790abe9ee40556fb3c5524388de0b

Findings

Domains resolving to IPs

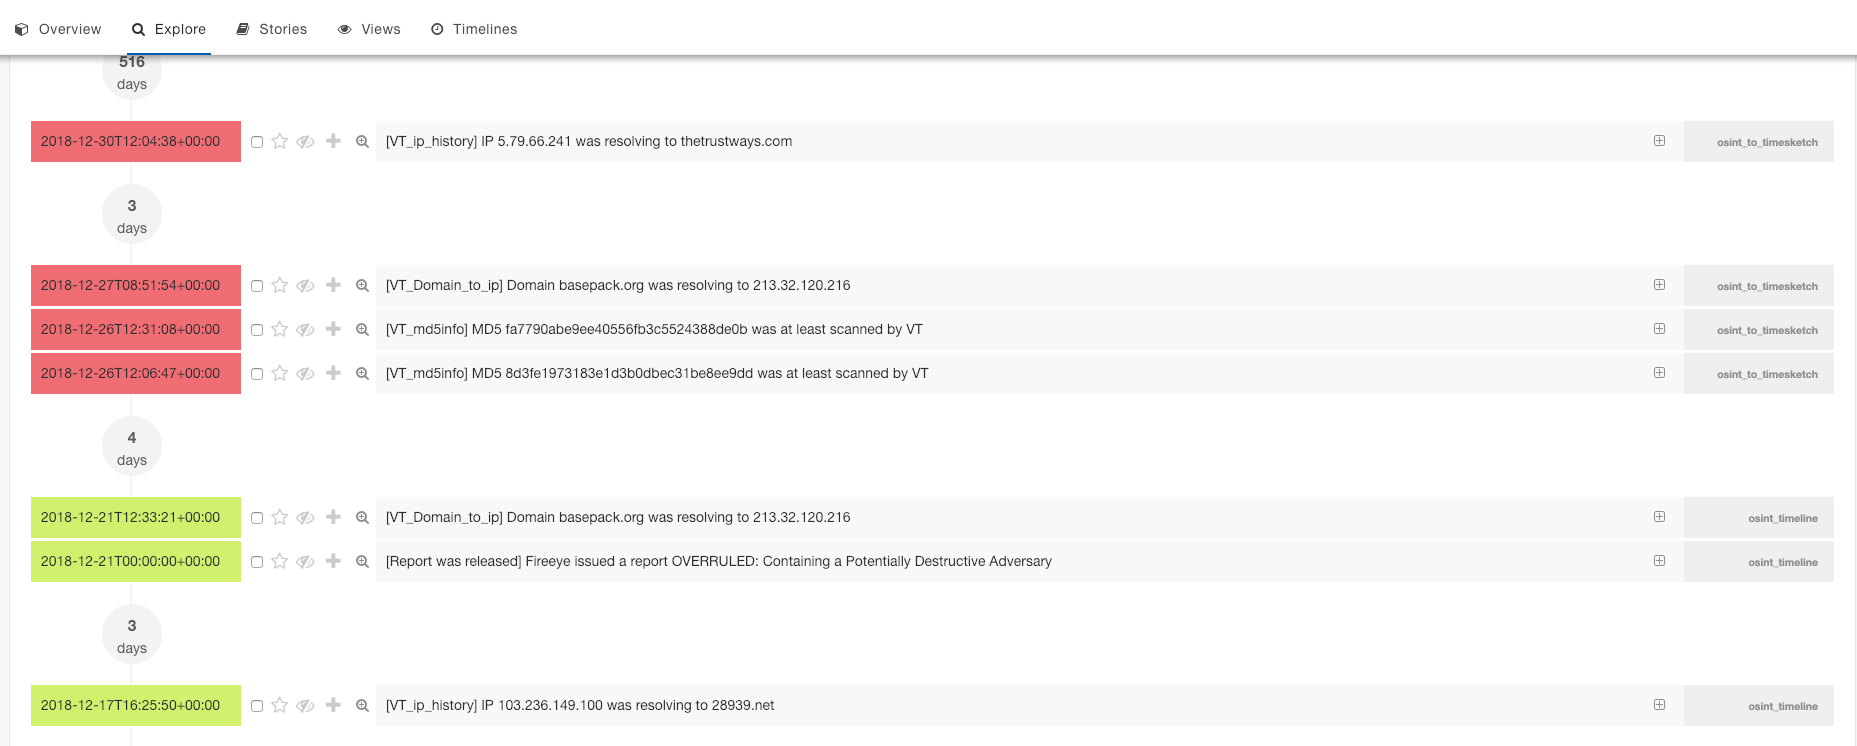
It is transparent when the hashes have been last scanned and what Ips resolve to the domains mentioned in the report.

The other thing is that right before some malware was mentioned by Fireeye in the report, SSL certificates became invalid:
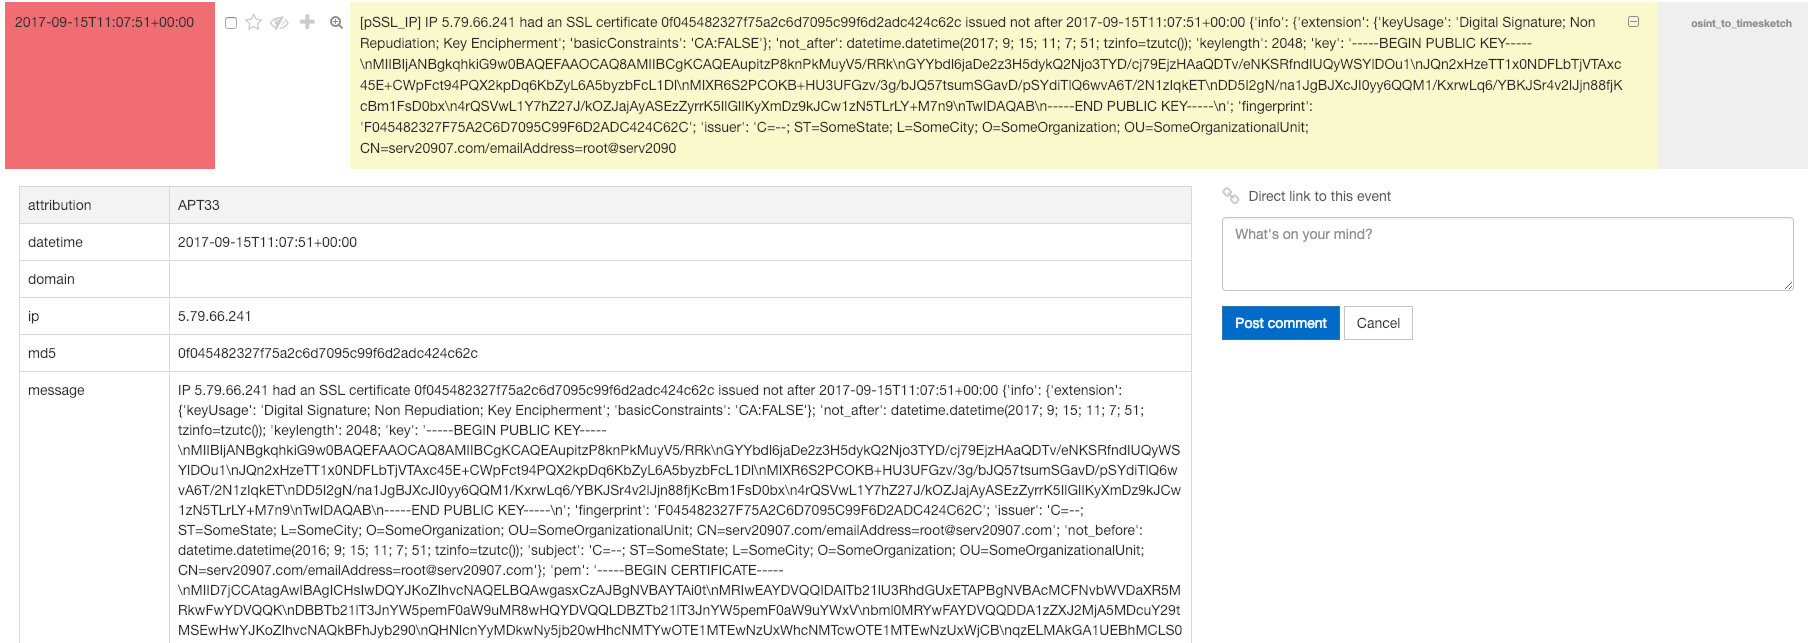
SSL Certificate

Of course the individual SSL certificate can also been investigated:

Python

The example is available on github: https://github.com/deralexxx/osint_to_timesketch

Next steps

  • Waiting for VT to expose more things
  • Improve the script
  • Introduce multiple pDNS providers

Timesketch on an Raspberry Pi3

TLDR

Does not work at the moment

Idea

Playing with Timesketch (timesketch.org) for a while I was wondering if it is possible to install Timesketch on a Raspberry Pi 3 to do some basic analysis, no heavy GB plaso imports and such.

A raspberry Pi is around 40 $, so pretty cheap and can be ordered almost everywhere on the planet, and you might already have some PIs from previous projects like:

I have also written about Timesketch / and or maintaining the following Github repositories:

Basic installation

I used the Noobs Image to install the raspberry using a 128 GB Micro SD card to have enough storage.

Java

Trying to install Java will cause some Java issues because you need to install it manually, follow:

https://www.raspberrypi.org/forums/viewtopic.php?t=101543

sudo mv /usr/lib/jvm/java-8-openjdk-armhf/jre/lib/arm/client /usr/lib/jvm/java-8-openjdk-armhf/jre/lib/arm/server

Installing Elastic Search

Follow that article:

Installing Timesketch

Simple, SSH to your raspberry pi and follow:

When installed elasticsearch:

vi /etc/elasticsearch/elasticsearch.yml

Add the following:

network.bind_host: 127.0.0.1

pycipher

This one is a bit tricky because it might fail with:

Collecting pycypher==0.5.9
Could not find a version that satisfies the requirement pycypher==0.5.9 (from versions: )
No matching distribution found for pycypher==0.5.9

Docker

https://medium.freecodecamp.org/the-easy-way-to-set-up-docker-on-a-raspberry-pi-7d24ced073ef

Docker-compose

sudo apt-get install docker-compose

So pycypher does kill the posibility to use Timesketch on a raspberry at the moment:

 Getting page https://www.piwheels.org/simple/pycypher/
  Looking up "https://www.piwheels.org/simple/pycypher/" in the cache
  Current age based on date: 30
  Freshness lifetime from request max-age: 600
  The response is "fresh", returning cached response
  600 > 30
  Analyzing links from page https://www.piwheels.org/simple/pycypher/
  Could not find a version that satisfies the requirement pycypher (from versions: )
Cleaning up...
No matching distribution found for pycypher

Amazon Fire HD als digitaler Bilderrahmen

Das perfekte Weihnachtsgeschenk wäre doch ein digitaler Bilderrahmen der sich aktuelle Fotos immer aus der cloud zieht sodass man ganz einfach neue Bilder mit den Eltern oder Großeltern teilen kann.

Ausgangsprodukt

Genau dieses Ziel hatte ich, möglichst günstig und anwenderfreundlich sollte es sein. Meine Wahl fiel dabei auf die Fire HD Tablets von Amazon. Diese sind nicht nur schön günstig, sondern von der Ausstattung auch ausreichend.

Einrichtung

Nach dem Kauf und der Lieferung muss eine Aktualisierung der Amazon Fire OS durchgeführt werden. Das dauert ein paar Minuten.

Google Play Store

Der nächste Schritt ist das installieren von Google Play Store bzw. einigen notwendigen Abhängigkeiten, ich habe mich dabei an die folgende Anleitung gehalten:

Hat man das gemacht kann man sich die App „Fotoo“ im Google Play Store installieren.

App: Fotoo

Es ist zu empfehlen, die Premium-Variante als InApp Kauf zu erwerben, es schaltet einige coole Features frei und hat keinen Session Blocker (heißt nach einiger Zeit bekommt ihr einen zwei Minuten delay, in denen kein neues Bild angezeigt wird)

Bild 1: Fotoo your session will resume in… Go premium

Premium

Es ist Empfehlenswert, sich Fotoo in der Premium Variante zu kaufen. Nutzt man den gleichen Google Account auf mehreren Fire Tables, muss man die Premium Variante auch nur einmal kaufen.

Einstellungen

Die Einstellungen in Fotoo selbst sind in dem folgenden Artikel schön beschrieben

https://www.howtogeek.com/335161/how-to-turn-an-old-android-tablet-into-an-auto-updating-digital-photo-frame/

Einziger Stolperstein dabei, wie man den Developer Mode im FireHD aktiviert:

In Android: Settings –> Device Options –> Tap Serial Number Field  7 times

Jetzt ist der developer mode aktiviert und man kann das Display auf „stay awake“ schalten. 

Eigenschaften

Ab dann hat der Bilderrahmen folgende Eigenschaften

  • Schaltet sich automatisch bei Anschluss des Ladekabels an
  • Bilder werden automatisch gewechselt
  • Bilder werden über die Cloud verwaltet

Stolperstein in Google Photos

Einziger Wermutstropfen, Google Fotos erlaubt es aktuell noch nicht, geteilte Alben über Apps abzurufen, d.h. ihr müsst die Alben in euer lokales Album kopieren, oder eben auf einen Dropbox oder Google Drive Ordner zurück greifen.

Fertiges Vergleichsprodukt

Ein vergleichbarer fertiger Bilderrahmen wäre z.B. der NIXPLAY Seed Digitaler Bilderrahmen WLAN 8 Zoll W08D Schwarz, aktueller Preis sieht man im unteren Banner. 

Dem gegenüber hier ein paar Amazon Fire HD Angebote, welche auch für andere Zwecke genutzt werden könnten.

Ablauf um Bilder mit der Familie zu teilen

Wir gehen mal von drei Familien aus, bei der Familie A Bilder mit Familien B und C teilen wollen.

Familie A macht Fotos wie es ihnen gefällt, laden die schönen Fotos in Google Photos hoch, arbeiten gemeinsam an einem Album. Irgendwann sagt Familie A, wir wollen diese Fotos jetzt Familie B und C zeigen, also teilen sie das Album mit Google Account 1 und Google Account 2 von Familie B und dem / den Google Accounts von Familie C.

Google Account 1 bekommt jetzt einen Hinweis, dass er neue Fotos freigegeben bekommen hat, er öffnet die Einladung, sieht die Fotos und klickt auf „Add to library“ (siehe Screenshot). Dadurch wird das Bild in eure eigene Library kopiert und Fotoo kann auf diese nun zugreifen.

Bild 2: Add to library

Danach öffnet Account 1 Person sein Fire HD Tablet, öffnet Fotoo (sofern noch nicht geöffnet), öffnet die Settings und fügt das neue Album zur Fotoo Show hinzu – fertig.

Bild: Fotoo Photo Streams Quellen Auswahl

Wenn jetzt neue Bilder zu dem geteilten Album hinzugefügt werden, muss der Empfänger erneut den Button zur lokalen Library hinzufügen durchführen, man kann sich also überlegen, immer das gleiche zu nutzen oder immer neue Alben zu teilen.

Amazon Account entfernen

Wenn man das Fire HD Tablet verschenkt, muss in den bisherigen Schritten ein Amazon Konto hinterlegt sein, um die Apps zu installieren usw. Wenn man bis zu diesem Schritt gekommen ist, kann gefahrlos der Amazon Account von dem Fire HD entfernt werden. Solange der Google Play Store mit Google Installiert bleibt, bleibt auch die Fotoo App bestehen.

Den Amazon Account entfernt man über Einstellungen –> Mein Konto –> Abmelden

Dann kann das Tablet gefahrlos verschenkt werden, ohne, dass das Tablet Einkäufe im eigenen Namen machen könnte.

Amazon Werbung entfernen

Wurde ein Fire HD Tablet mit „Spezialangeboten“ gekauft um etwas Geld zu sparen, kann man getrost einfach das Amazon Konto entfernen, damit entfallen auch die Werbeangebote.

Hier kann man lesen wie

Anleitung

Um den Nutzern des Bilderrahmens eine Anleitung zur Hand zu geben habe ich ein Google Docs Dokument angelegt, welches auf aktuellem Stand gehalten wird : https://docs.google.com/document/d/11VTXk1-aKlKOdWG0BTiSjbFy-PSn3iVSJZOlkcHFjlI/edit?usp=sharing

Next steps

  • Nächster Schritt wird dann der Bau eines Ständers mit Lego.
  • Induktives Aufladen
  • Optik an einen Bilderrahmen anlehnen

Fazit

  • Günstiger digitaler Bilderrahmen
  • kann auch als normales Tablet genutzt werden
  • Sehr gute Bildqualität
  • Schaltet sich automatisch bei Anschluss des Ladekabels an
  • Bilder werden automatisch gewechselt
  • Bilder werden über die Cloud verwaltet
    • Google Drive
    • Google Photos
    • Dropbox
    • Microsoft OneDrive
  • Bilder können auch lokal auf dem Gerät gespeichert werden
  • Verteilbar auf verschiedene Familien
  • Bilder können remote aktualisiert werden
  • Digitaler Bilderrahmen kann WLAN