This Blog Post will cover a howto for a complete monitoring setup.
I wanted to create a monitoring solution for a bunch of Raspberry Pi, a FritzBox, a QNAP Nas, Windows Clients and Apple OSX Workstation.
The monitoring device is another Raspberry Pi with Raspian installed.
The first coice for a monitoring solution is of course Nagios. It’s free, it’s open source and it’s high scalable. The problem with Nagios out of the box: it’s complex, it is too complex to do it in the small home network.
To save time, there is an complete collection of tools called OMD – open monitoring distribution.
OMD avoids the tedious work of manually compiling and integrating Nagios addons while at the same time avoiding the problems of pre-packaged installations coming with your Linux distribution, which are most times outdated and provide no regular updates.
OMD bundles Nagios together with many important addons and can easily be installed on every major Linux distribution. We provide prebuilt packages for all enterprise Linux distributions and also for some other, such as Ubuntu.
A german howto for installing OMD on an Raspberry Pi is available here.


This monitoring pi is now named nagiospi.
But to use the version 1.0 you will need the following commands:
sudo su

echo 'deb http://labs.consol.de/repo/stable/debian wheezy main' >> /etc/apt/sources.list

gpg --keyserver keys.gnupg.net --recv-keys F8C1CA08A57B9ED7 #install PGP Key of Sven Nierlein sven.nierlein@consol.de

gpg --armor --export F8C1CA08A57B9ED7 | apt-key add -

apt-get update

pi@nagiospi ~ $ sudo apt-cache search omd

cp2k - Ab Initio Molecular Dynamics

customdeb - Modfies binary Debian package

dicomnifti - converts DICOM files into the NIfTI format

isomd5sum - ISO9660 checksum utilities

libtemplate-provider-fromdata-perl - module to load templates from your __DATA__ section

python-pyisomd5sum - ISO9660 checksum Python module

tofrodos - Converts DOS Unix text files, alias tofromdos

vrflash - tool to flash kernels and romdisks to Agenda VR

omd - Open Source Monitoring Distribution

omd-1.00 - Open Source Monitoring Distribution, containing Nagios,

root@nagiospi:/#apt-get install omd-1.00
After that you have to install a OMD site:
root@nagiospi:/#omd create pimon

will create a folder /omd/sites/pimon/tmp

root@nagiospi:/#ifconfig # to gather the IP of your Pi
You can now access the webpage using
The site can be started with omd start pipi. The default web UI is available at http://raspberrypi/pipi/ The admin user for the web applications is omdadmin with password omd. Please do a su - pipi for administration of this site.
root@nagiospi:~# omd start pimon
Starting dedicated Apache for site pimon…OK
Starting rrdcached…OK
Starting npcd…OK
Starting nagios…OK
Initializing Crontab…OK
root@nagiospi:~#
Now access http://$IP_OF_YOUR_PI/pimon with default credentials stated before.
To gather data, you will now have to login to another pi: senderpi.
The senderpi will provide an interface / port for the nagiospi to collect data. To do so, the script check-mk from Matias Kettner is perfect. It is available for Linux, Windows etc.
Want to learn more about Nagios / Monitoring:


root@senderpi:/#sudo apt-get install xinetd check-mk-agent
After that you have to edit at least the file: vi /etc/xinetd.d/check_mk
For security reasons, remove the # in the line and include the IP of $nagiospi
root@senderpi:/#vi /etc/xinetd.d/check_mk

only_from = 127.0.0.1 $IP_OF_YOUR_NAGIOSPI
so that only your nagiospi can access the port and the information.
To enable the script, change the value in the file from yes to:
disable = no
Restart xinetd:
root@senderpi:/# service xinetd restart

[ ok ] Stopping internet superserver: xinetd.

[ ok ] Starting internet superserver: xinetd.
Check if the service is running:
root@senderpi:/# netstat -anon | grep 6556

tcp 0 0 0.0.0.0:6556 0.0.0.0:* LISTEN aus (0.00/0/0)

root@senderpi:/# nc 127.0.0.1 6556

<<<check_mk>>>

Version: 1.1.12p7

AgentOS: linux

PluginsDirectory: /usr/lib/check_mk_agent/plugins

LocalDirectory: /usr/lib/check_mk_agent/local

AgentDirectory: /etc/check_mk

OnlyFrom: 127.0.0.1 $IP_OF_YOUR_NAGIOSPI

(...)
To increase security, use the following iptables rule to prohibit unauthorized access to the OMD / Nagios / mk-check port:
iptables -A INPUT -i eth0 -p tcp -s $IP_OF_YOUR_NAGIOSPI --dport 6556 -m state --state NEW,ESTABLISHED -j ACCEPT
You can also check from your nagiospi command line:
nc covert 6556 $IP_OF_YOUR_SENDER_PI
Now go to the page:
http://$IP_OF_YOUR_NAGIOSPI/pimon/check_mk/

Default username: omdadmin password: omd
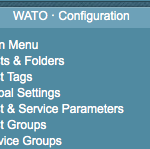
And go to „Hosts and folders“ on the left menu.
Click create host and insert all of the data:$IP_OF_YOUR_SENDER_PI.
–> Save and check services
Your nagiospi now tries to connect to your senderpi and checks for info.
Save it.
On the top screen there is a button „1 Change“ klick it and confirm it.
To change the password:
http://$IP_OF_YOUR_NAGIOSPI/pimon/thruk/#cgi-bin/conf.cgi?sub=users&action=change&data.username=omdadmin&
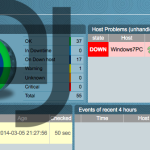
Now your host has been added to monitoring. All information should be available to your nagios and you will be alerted e.g. the SD card of the PI is running out of space.


-

-
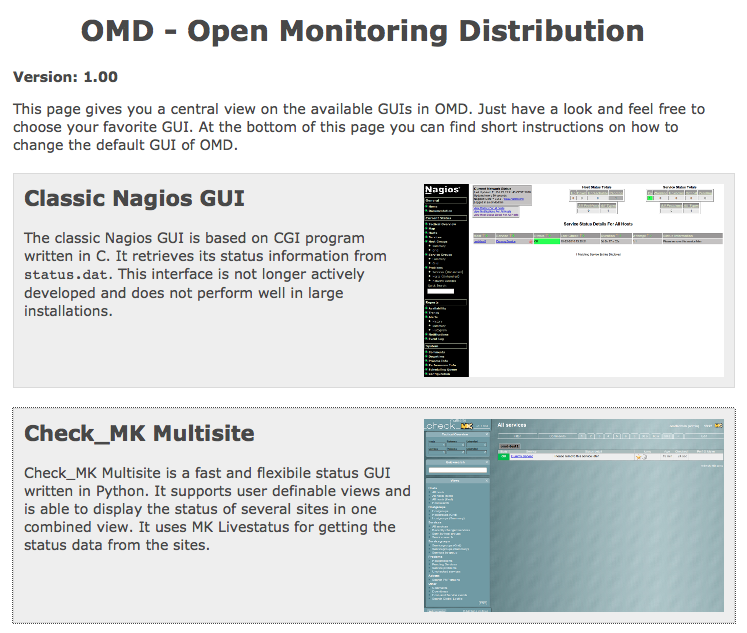
OMD Main Screen
-
-
WATo Configuration
-

-
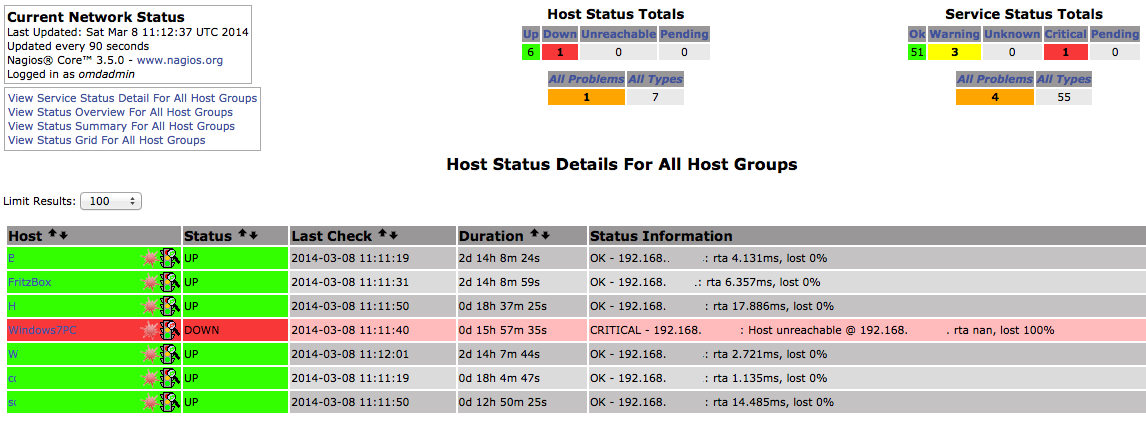
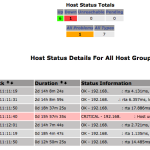
MK all hosts
-
-
MK overview
-
-
Nagios Overview