MISP is a very well known tool in the infosec community that enables individuals and teams to work and share indicators and other case relevant information.
The MISP API comes for free with every MISP installation of the free and open source software, so if you want to try it out, go for it. There are various install guides for MISP.
Once your MISP instance is up and running, you can head over to the MISP API documentation.
Search
Among all endpoints I did use the Search endpoint the most. This endpoint can be used to search all your MISP data. You can either just pass a string and search everything, or you filter by dedicates types. The query can be as complicated as you want it to be. Be careful with just value searches, depending on your data size, the requests might take a while to complete.
Get events
Another very useful thing after your searched is then pull the events that matched your search. This can be helpful to provide more context to analysts who started the search.
PyMisp
When writing about the MISP API, it is important to mention pyMISP, the Python library to access the MISP REST API. It is maintained by the same people behind MISP, so it is kind of a reference implementation of the API and is very easy to use.
Target audience
The target audience for the MISP API is researchers, students, DFIR professionals and everyone who has a need to store and query structured data around events.
Together with two team members, I had the opportunity to give a webinar to 100+ virtual attendees covering a digital forensics scenario with Colab / Jupyter and Timesketch.
It was really fun and I hope people are able to get some ideas. The webinar did not cover all things we put into the notebook shared on the Timesketch Github repository, so even if you watched the webinar, it is still worth to check it out.
While writing some code, I stumbled across a API documentation, that only had curl examples (prefer to have curl examples over no examples at all) but I had some troubles converting it to proper python code and a friend recommended a page called: https://curl.trillworks.com/
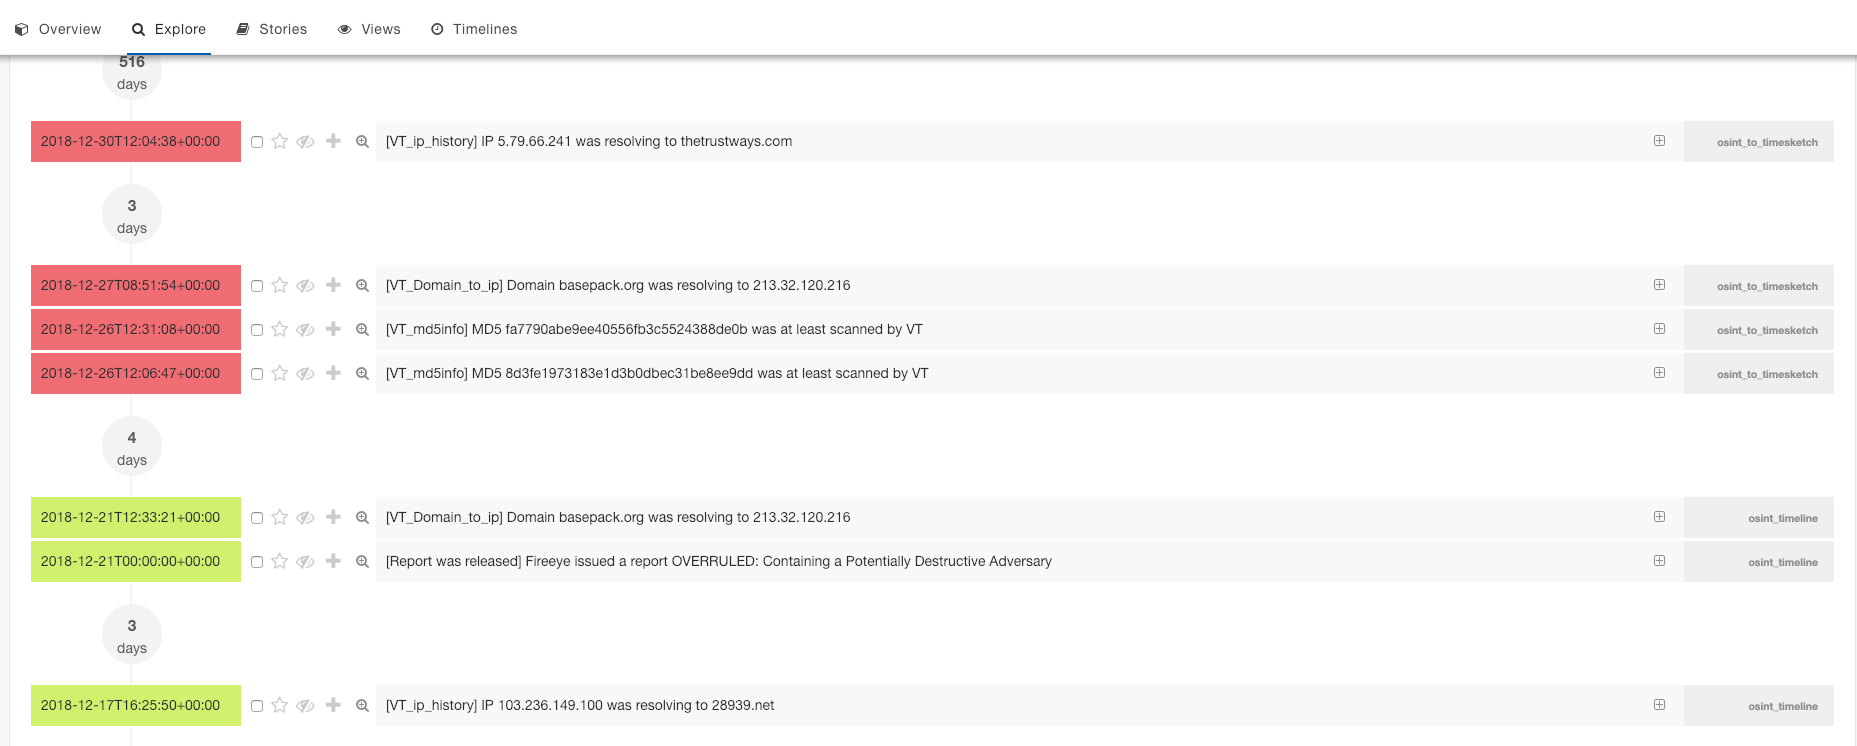
Playing with Timesketch for a while and working on some OSINT timelines I was tired to investigate MD5 and domains / ips all manually so I tried to automate some of the work. Why is that important? If you have a list of hashes, domains and IPs, you of course can check your SIEM, EDR solution etc – but what if you have a hit? Would it benefit your investigation to at least have an idea of the timeframe something was used by attackers or seen in the wild?
Most shared indicators are lacking the timeframe, so we need to add those values by external information on our own.
Virustotal
There is no need to further explain Virustotal, it is basically a huge dataset of malware and information about domains and ips.
In particular information about a specific point in time a domain was seen to point to an IP and back is good to know to build your timeline.
E.g. if you have verymalicious.com pointing to 127.0.0.1 all the time, only on one day it was pointing to 1.2.3.4 – hits in your infrastructure should be higher escalated if seen during that day, out of that time window it might still be important, but not as urgent as during that day.
In regards to hash intelligence, Virustotal is nice, because if you add the info, when the last scan date of a file was, you can at least tell, that the file was known after that day.
I asked Virustotal to add more information they already have to the API and we will have wait till it is exposed:
First seen in the wild
First uploaded to VT
PE compile time
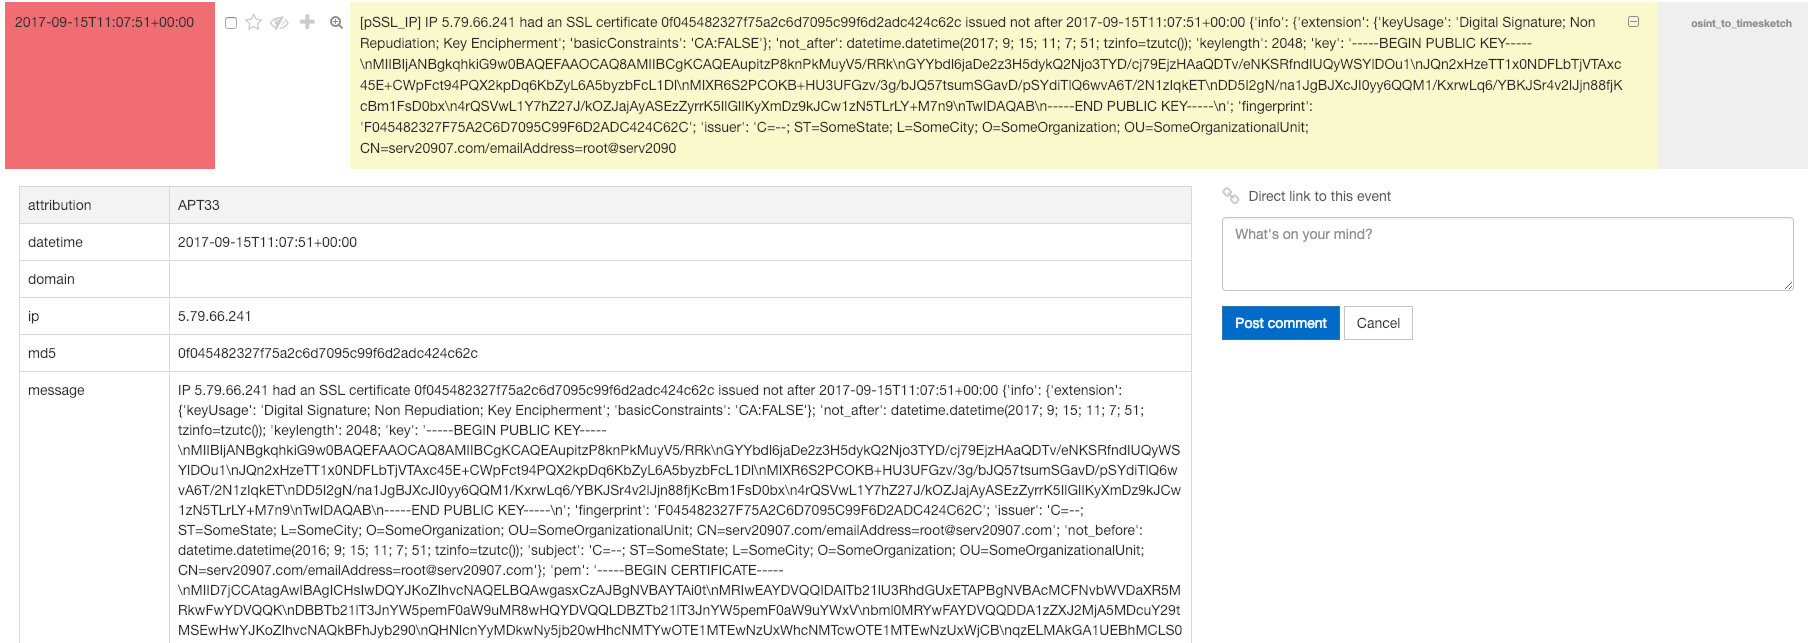
PassiveSSL
Alexandre Dulaunoy and Eireann Leverett have given a talk at the FIRST conference in Berlin back in 2015, which took my attention, but it took some time till I really had time to implement something to use the idea.
The basic idea is that, out of several sources, passive ssl services such as CIRCL passiveSSL collect certificates and expose information via API.
For timeline analysis in particular, the following dates are important as they might shine some light of attacker activity:
first seen in the wild
last seen in the wild
not use before
not use after
If you now add all of the information above, you might be able to get a better idea, when an IP / Domain / File was active.
This information should then be fed into a Timesketch investigation.
Example
Using some sample data from APT33: https://github.com/deralexxx/osint-timelines/blob/master/2018/2018-12-21.OVERRULED:-Containing-a-Potentially-Destructive-Adversary-APT33.csv
Combining with the python script below with the following indicators:
I am happy to say that a new tool made it to github called „timesketch-tools“.
It is basically a way to interact with Timesketch via CLI. For those who don’t know Timesketch, it is an amazing opensource tool developed by Johan Berggren and is used to create timelines for forensic investigations as well as incident response cases.
Reason
Back in 2017, Johan tweeted:
Do you want to build automation around forensic timeline analysis? try: pip install timesketch-api-client #DFIR
timesketch-tools.py --add_events

         _______               __       __      __
        /_  __(_)_ _  ___ ___ / /_____ / /_____/ /
         / / / /  ' \/ -_|_-</  '_/ -_) __/ __/ _
        /_/ /_/_/_/_/\__/___/_/\_\__/\__/\__/_//_/-tools v0.1


Please provide the sketch id you want to add events to as (an integer): 3
Please provide informations to the event you would like to add timestamp, timestamp_desc, message will be promted

Timestamp (use Format: YYYY-mm-ddTHH:MM:SS+00:00 2018-01-15T10:45:50+00:00) use c for current time c
timestamp_desc this is the description
message something was hacked
Event added, ID: 18 Date:2018-10-31T14:49:41+00:00 timestamp desc this is the description messagesomething was hacked
Add another event? (y/n)n
I have a lot of ideas to improve, so expect some more functionality added soon…
[03/26/16 01:32PM][runEyeFi] - Eye-Fi server started listening on port 59278
tcp 0 0 0.0.0.0:59278 0.0.0.0:* LISTEN 873/python
Seems okay
Upload Key
The first issue was the upload key.
Connected two different eyefi cards with OSX and Windows 7 and was unable to find an upload key other then 00000000000000000000000000000000
sqlite3 offline.db
SQLite version
Enter ".help" for usage hints.
sqlite> SELECT o_mac_address, o_upload_key FROM o_devices;
00-11-11-11-11-11|12345678901234567890123456789012
Hm but still, using that upload key (was reducted) the eyefiserver2 did not work.
And I was unable to get a connection from my camera to my pi.
If you are trying to for example develop python and accessing something encrypted with SSl and that SSL certificate is not signed by a well known CA you might get an error.
That is because your CA is not added to the local CA store of e.g. Ubuntu.
Then the new certificates will be added to your local store.
(please be careful as sudo dpkg-reconfigure ca-certificates is only checking for files *.crt, so no *.cer etc).
apt-get install eclipse

open eclipse

 help --> Install New Software

 add button

 insert: PyDev

 Position: http://pydev.org/updates

 check all

 accept license

 Next

 Window -> Preferences -> PyDev -> Interpreter -> Python

 New -> link to python interpreter (default: /usr/bin/python)

 finish